I’ve recently discovered the joy of using Sitecore Connect to interface with AI APIs, and I’d love to share an end‑to‑end example, with lots of information sprinkled throughout this post. Sitecore Connect (a white‑labeled version of Workato) lets you build low/no‑code recipes with multiple triggers and actions across products, like Zapier, MuleSoft, or Power Automate, but with Sitecore-native connectors and recipes.
In this walkthrough, we’ll remove the background from an image stored in Sitecore Content Hub using a model hosted on Replicate. We’ll kick work off from Content Hub, push the image over to Replicate, run the image through our AI model, and then push the processed image back to the original asset, all orchestrated by two Sitecore Connect recipes.
Keep in mind that you must have already connected Sitecore Connect to Content Hub. If you haven’t done this yet, nothing we do will work when you try to POST your new image back to Content Hub! I’ll do another post on this topic soon, but essentially, you must have an API key created for Sitecore Connect.
What we’re building
Goal: When we trigger a specific action in Content Hub on an asset with a public link, we want to:
- Send the public link URL to Sitecore Connect
- Have a Sitecore Connect recipe send the image URL to an AI model hosted on Replicate
- Once Replicate finishes the task, Sitecore Connect will receive a call to second recipe’s webhook when processing completes
- Sitecore Connect works backwards to resolve the original asset ID from the public link image URL. We must do this because our two Sitecore Connect recipes are unfortunately disconnected from one another and we can’t easily persist the asset information between recipes.
- Once we figure out the original asset ID, Sitcore Connect uploads the new image back to the same asset.
We’ll use this Replicate model: background-remover. It’s cheap and fast, and perfect if you need a lot of images processed quickly. The pattern is relatively generic, so you can swap in any other model on Replicate that accepts a public image URL and returns a file URL on completion.
How the Replicate call works
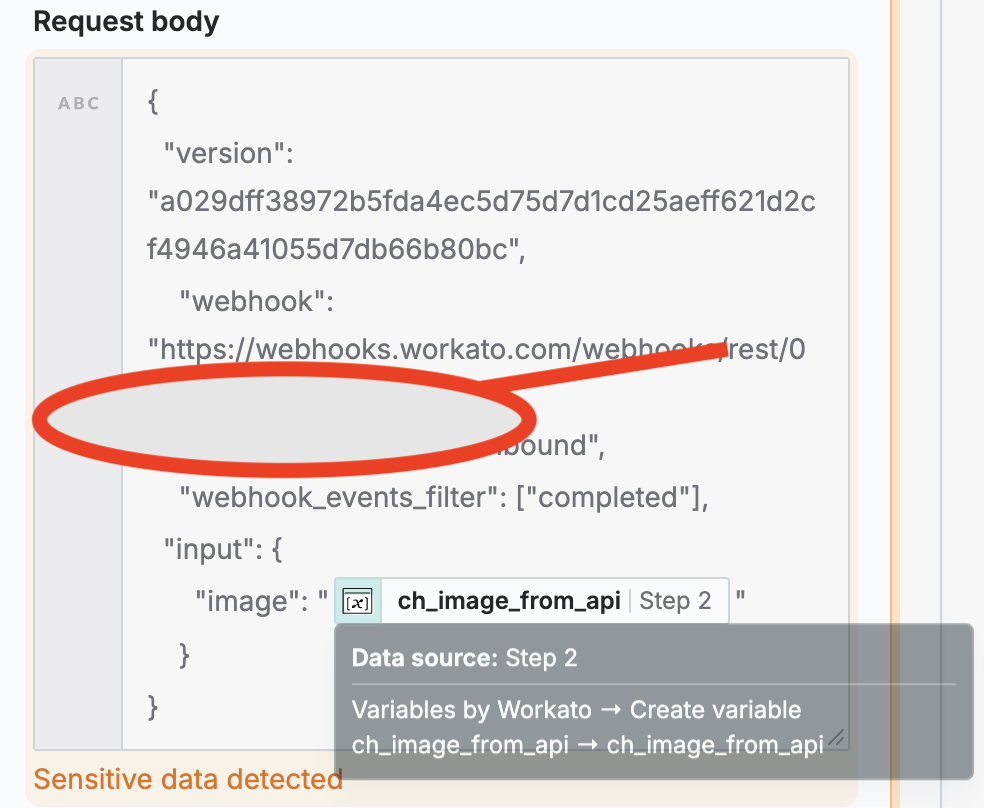
Replicate’s HTTP API accepts a model version, a webhook for status callbacks, an optional webhook_events_filter, and your model inputs. For background removal, the only required input is the image URL. Example body:
{
  "version": "a029dff38972b5fda4ec5d75d7d1cd25aeff621d2cf4946a41055d7db66b80bc",
  "webhook": "https://<your-connect-webhook>",
  "webhook_events_filter": ["completed"],
  "input": {
    "image": "https://<your-content-hub-host>/api/public/content/<RELATIVE_TOKEN>"
  }
}
The “version” property above represents the model we’ll be using for Replicate. Each model has its own version ID that can be used instead of the one we’re using above.
On completion, Replicate posts a JSON payload to your webhook, including:
status(e.g.,succeeded)- the original input (
input.image) - the
output(URL to the processed PNG)
We’ll lean on input.image to map results back to the correct Content Hub asset.
Content Hub upload flow (Upload API v2)
Uploading a file back to Content Hub is a three‑step process:
- Request upload: returns a short‑lived upload URL and a JSON body containing
upload_identifierandfile_identifier. - Perform upload: POST the file to the returned URL (multipart/form-data).
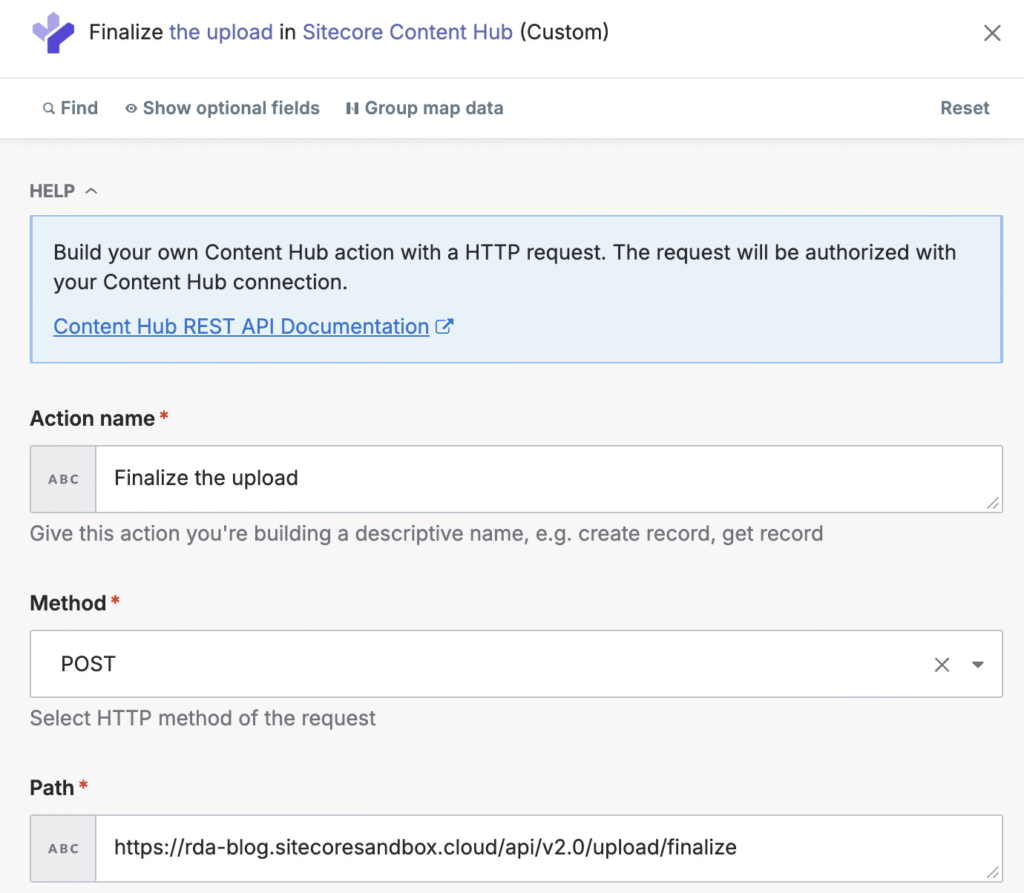
- Finalize: POST
upload_identifierandfile_identifierto finalize (response includesasset_idandasset_identifier).
You can target different actions:
NewMainFile(requiresAssetId)NewAlternativeFile(requiresAssetId)NewAsset
For this example, we’ll be re-uploading the new, removed background as NewMainFile.
Sitecore Connect Recipes
We need two recipes in Sitecore Connect: one recipe to send the image to Replicate to start the AI job, and a second to handle the webhook once it’s complete and upload the result back into Content Hub.
Recipe A — “Send to Replicate” (outbound)
We’re going to manually trigger a “remove background” action when we set everything up in Content Hub. Obviously, you can make tweaks to this if you’d like it so that it automatically runs this action every time an asset is approved or uploaded.
Our trigger will be “HTTP webhook”, and when we create the trigger, Sitecore Connect will give us a URL to hit. It’ll look something like this:
https://webhooks.workato.com/webhooks/rest/12345-12345-12345/remove-background. We’ll keep this address for when we setup our Content Hub action a bit later.
Let’s look at your recipe actions in Sitecore Connect.
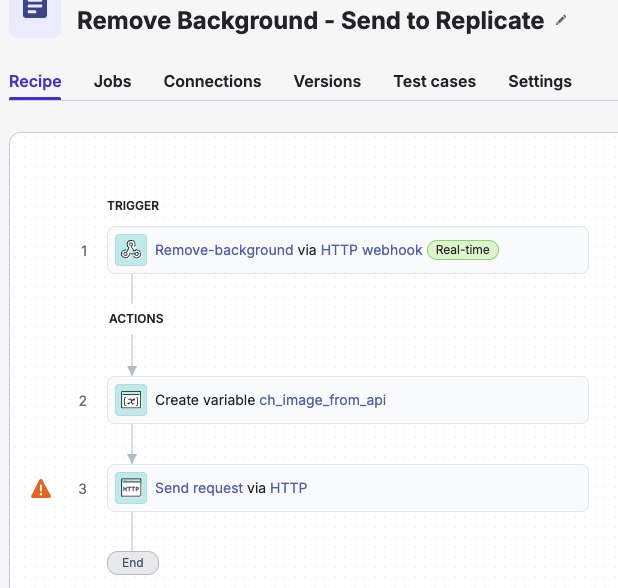
Remove-background via HTTP webhook
- We give ourselves a webhook for the Content Hub API to hit. In Content Hub, if you send a test connection to this event, it will automatically give you the default payload configuration so that you don’t need to input all that yourself.
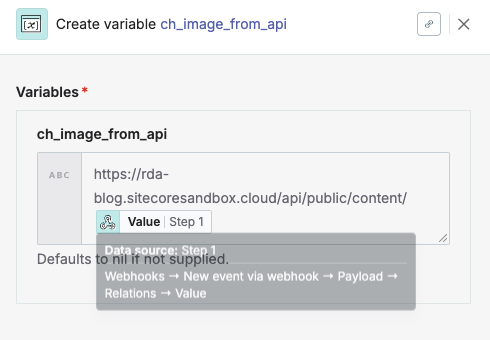
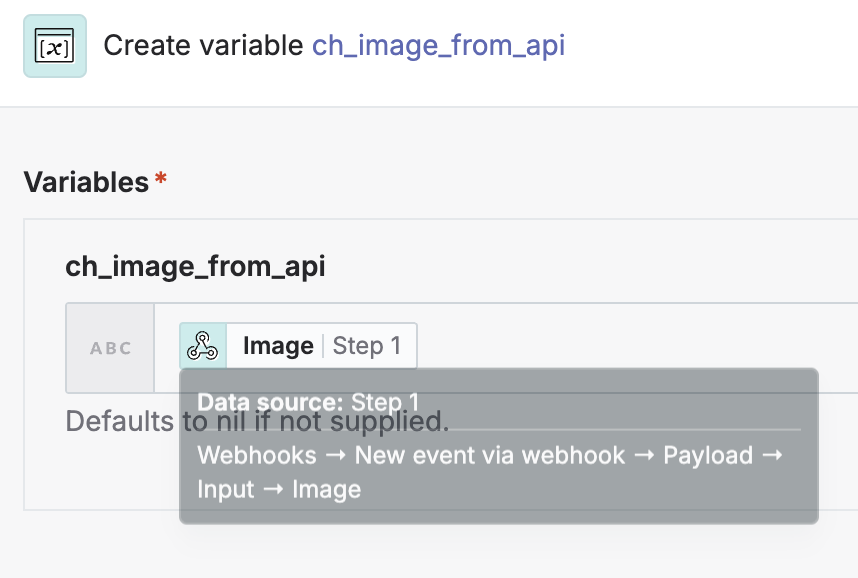
Create variable ch_image_from_api
- This variable will create our image URL for our image link for Replicate to access. Notice that the value we’re pulling is from what Content Hub sent us in the webhook trigger under Payload -> Relations -> Value.
Send Request via HTTP
- Method: POST
- Request URL: https://api.replicate.com/v1/predictions
- Request content type: Raw JSON request body
- Request body: See below. We’re calling the model through a specific “version” property, we’re using the webhook URL from our second recipe (not yet created – see below), we ONLY want to see requests to our webhook when our request is [completed], and our input image is going to be our image extracted from Content Hub in the variable we created in the previous recipe step.
Recipe B — “Receive from Replicate” (inbound)
Our trigger for this recipe will be: HTTP webhook (Sitecore Connect’s generic HTTP trigger). The webhook URL generated here should be fed back in to our 3rd recipe step from the previous recipe. We’ll be listening for our model to complete our job, then take that job and feed it back into Content Hub.
Next come your recipe actions in Sitecore Connect. Here’s how it looks in full. We’ll break it down step by step.
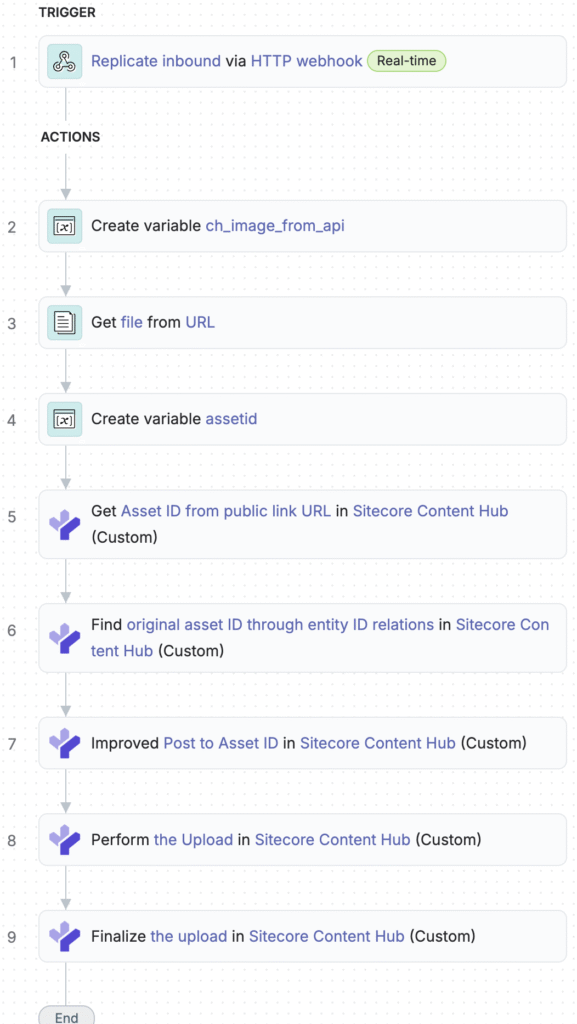
Replicate inbound via HTTP webhook
- Again, it’s best to set this webhook trigger up and have Replicate hit it once while testing so that it can create the payload schema for you.
Create variable ch_image_from_api
- Similar to our previous recipe, we’re going to pull the image URL from the payload that Replicate sends to our webhook and create a variable from it.
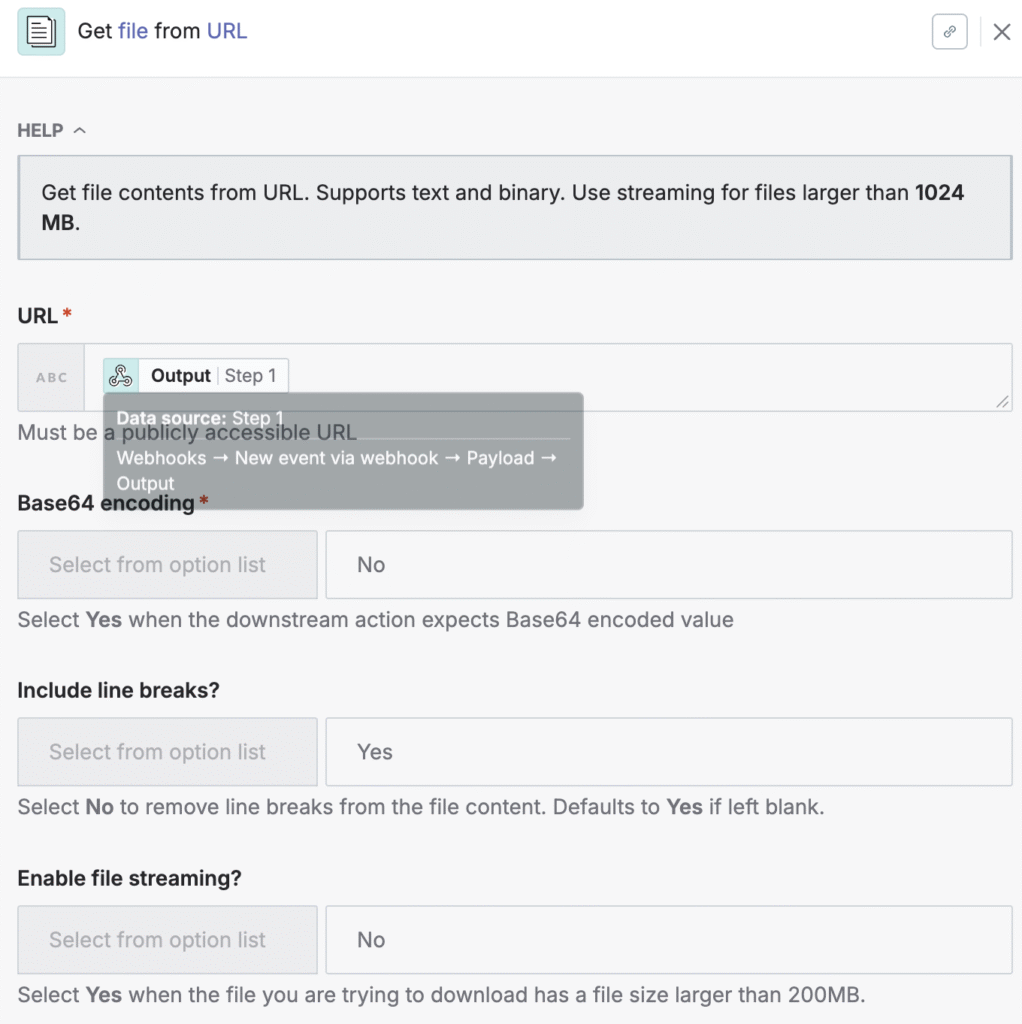
Get file from URL
- We’ll grab the file from Replicate using the built-in recipe for getting a file from a URL. Again, we’re grabbing the value from the payload from Replicate.
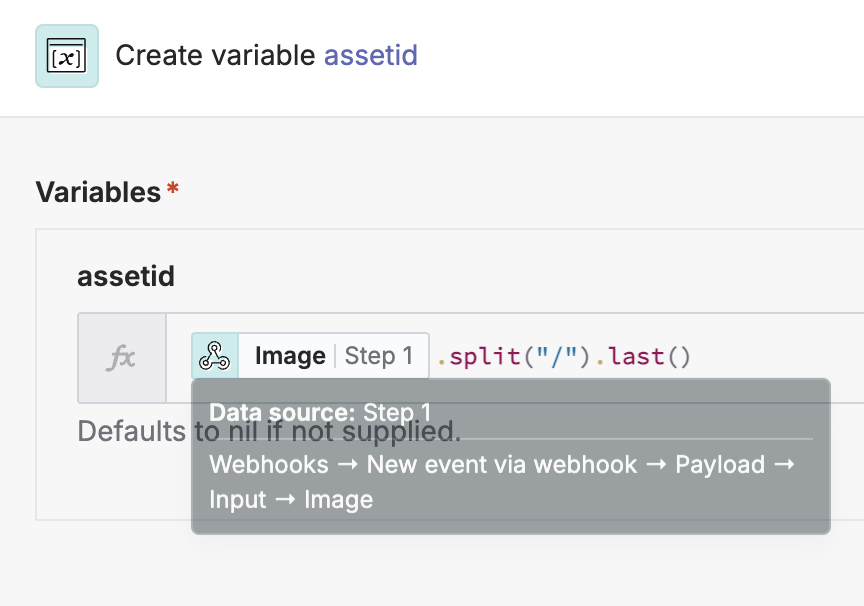
Create variable assetid
- We’ll create a new variable called assetid that will strip down the image URL to give us just the public link ID, so that we can begin to reverse engineer where we need to put the asset in Content Hub.
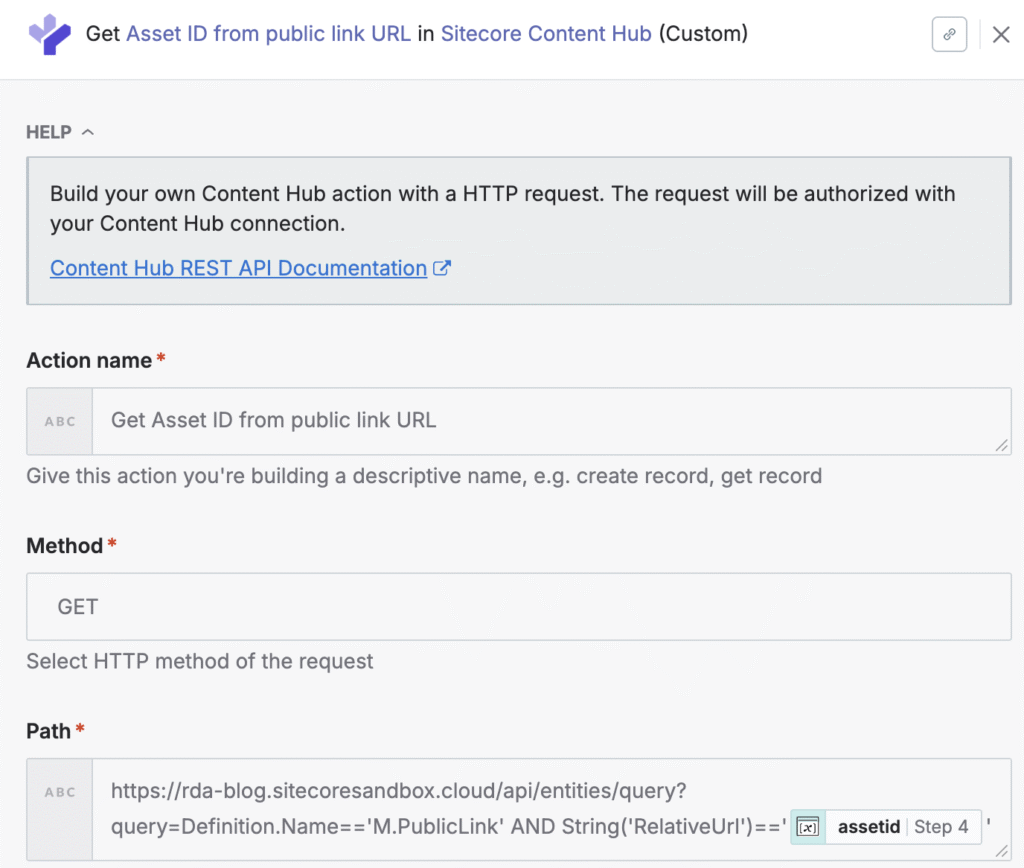
Get Asset ID from public link URL
- To start the reverse engineering, we’ll work to get the public link ID from the public link stripped down URL from the previous step. The query we’ll run should return only 1 object with an ID. That ID will be our asset’s public link ID.
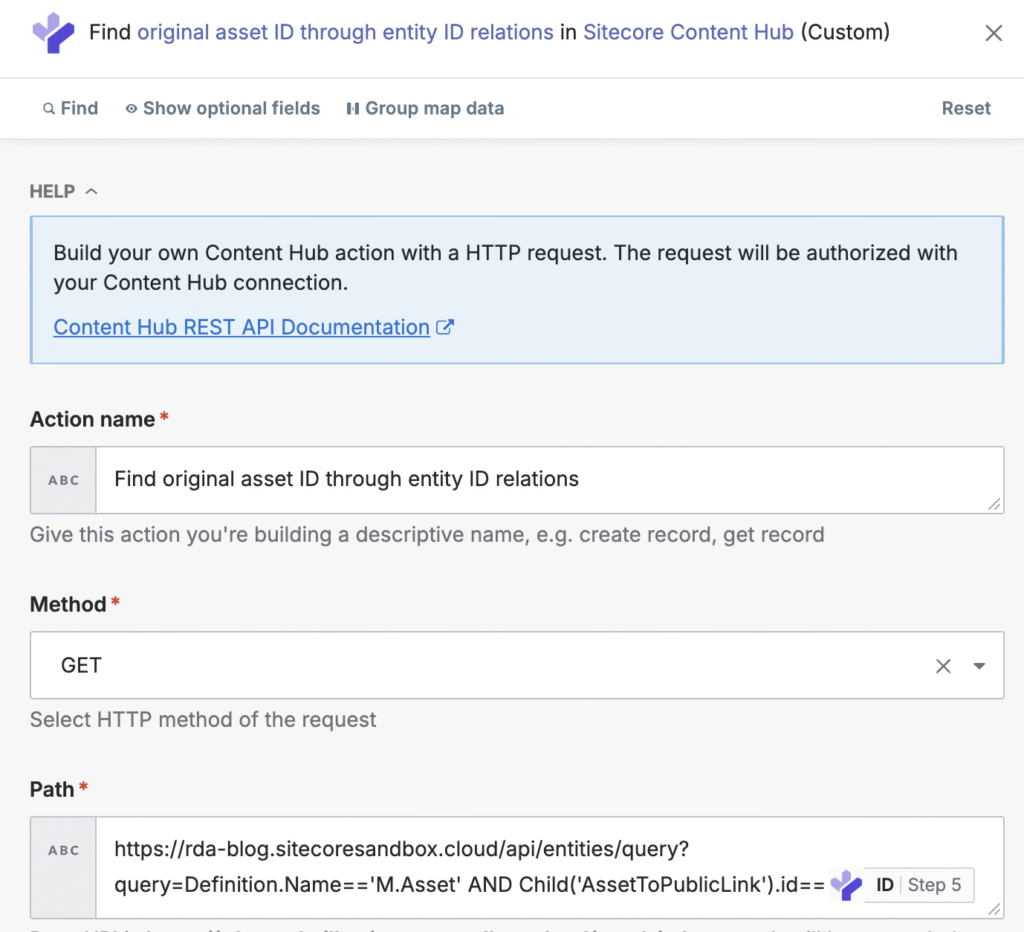
Find original asset ID through entity ID relations
- We’ll perform another query, this time looking for all public links that have that exact relative URL. Ideally, this one will return only one asset ID. That asset ID will be what we use to upload a new image.
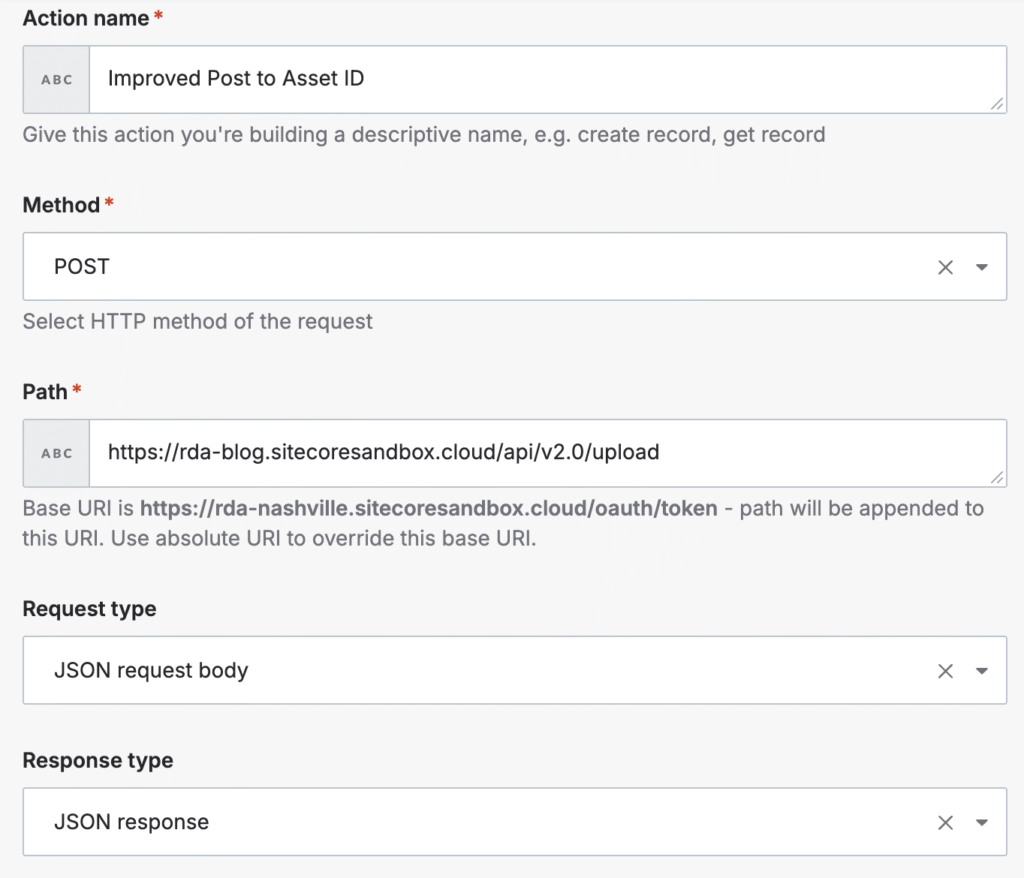
Improved Post to Asset ID
- Now we need to start the process of uploading the new image. We need to POST our request to the Upload v2 API, which in our case is https://rda-blog.sitecoresandbox.cloud/api/v2.0/upload .
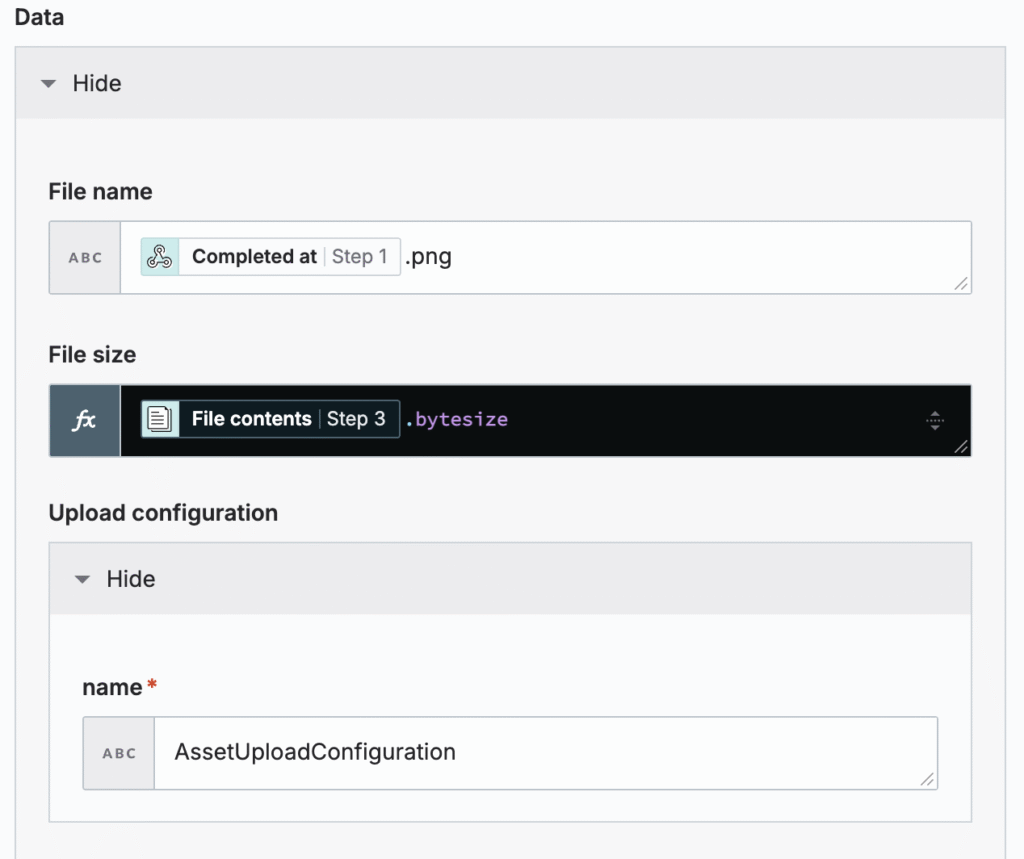
- In this same step, under the “Input” , we need to tell Content Hub what data we’re attempting to upload. We’ll specify the file name (we’re just using the file date/time sent back from Replicate), the file size (using the file contents properties from step 3 and specifying .bytesize afterwards), and the upload configuration we’d like to use.
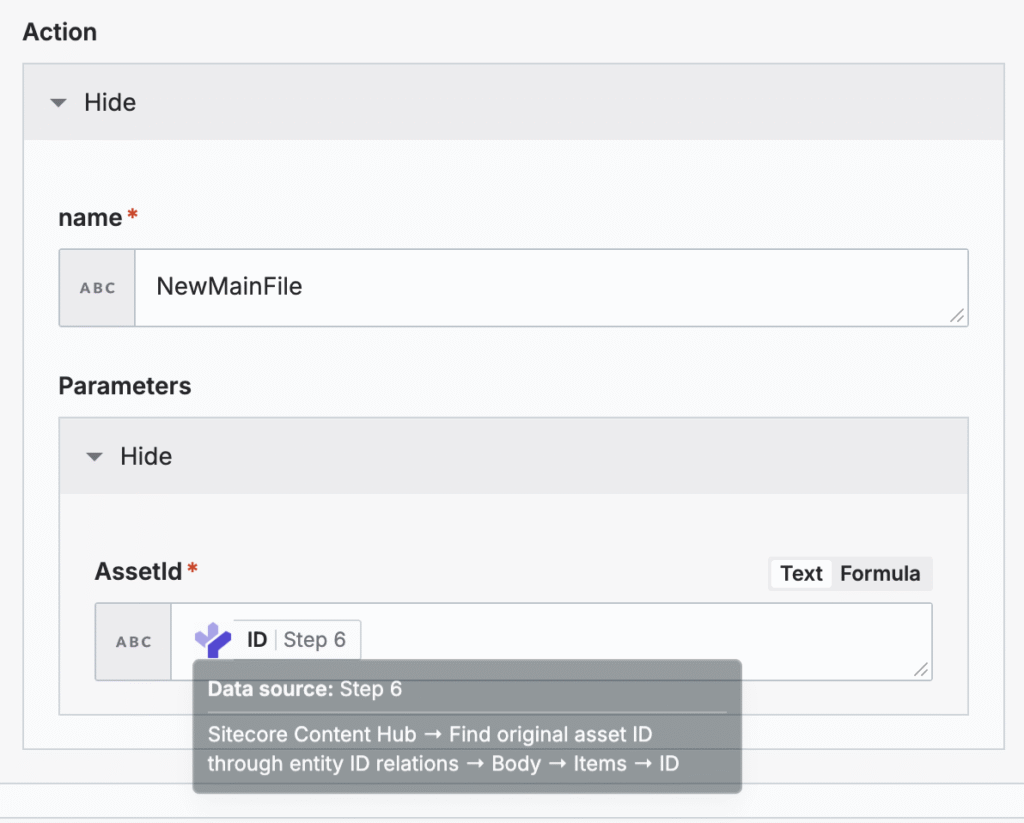
- Lastly, we need to tell Content Hub where we’d like to upload the file to. We’re going to grab the asset ID returned to us by our query in step 6 to show it where we need to upload our new file. This is the step where you may modify the action name to upload the file as alternate types (NewAlternativeFile).
- Now we need to tell Content Hub to process the upload by giving it to the file data. From step 7, we need to grab the location to upload the file to, then give it the data using the file contents property from step 3. We also need to specify the image type. Since we’ll always be receiving PNGs from our model we’ll use image/png. You may need to make this a variable field based on the input from the AI model’s response from Replicate if you receive other types of media.

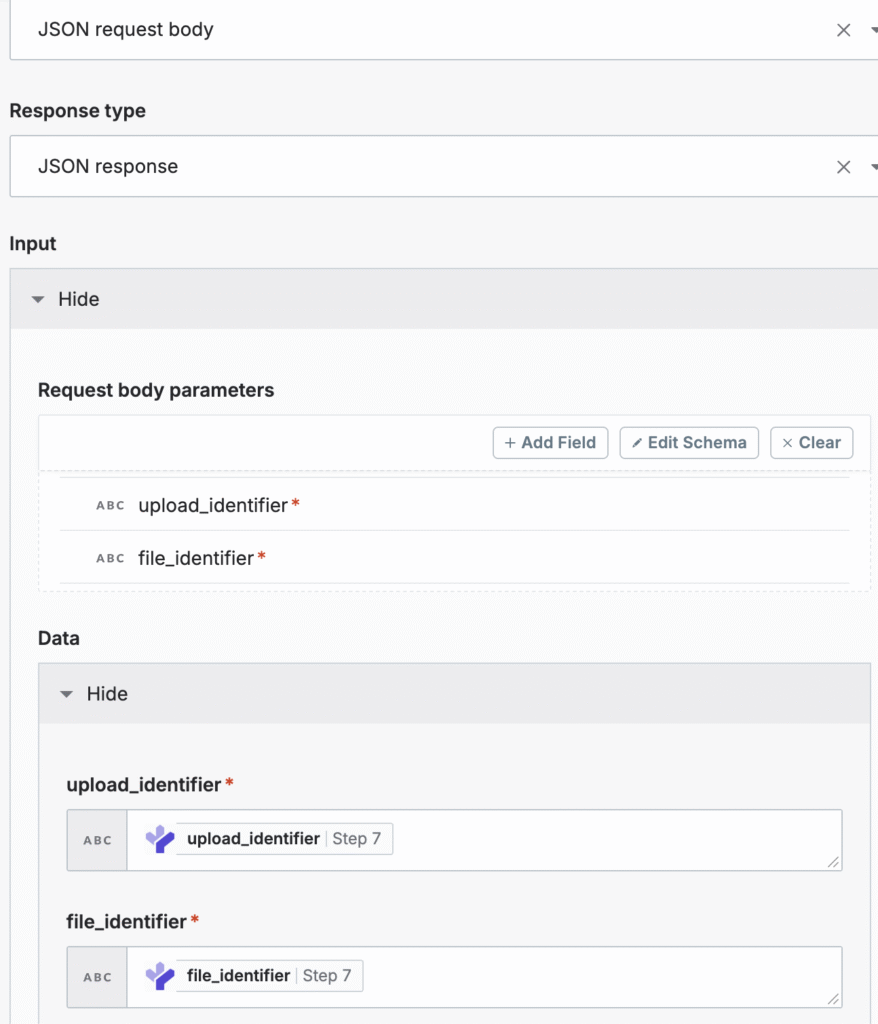
- Nearly there! Now, we just need to finalize our upload. We call the appropriate API endpoint and let it know our upload_identifier and file_identifier to complete the upload process from the response the API gave us to step 7 in our recipe.
Content Hub Setup
Alright, with Sitecore Connect fully setup, let’s make sure we’re setup in Content Hub. First things first, we need to create an API action that points to our webhook in recipe A. Go to Settings, then click on Actions, then create a new action.
Feel free to click “Test connection” to make sure your webhook address is correct. Keep in mind, you must have already connected Sitecore Connect to Content Hub. If you haven’t done this yet, nothing will work when you try to POST your image back to Content Hub! This allows you to create recipes that use that API key to do all the items we mentioned in the workflow.
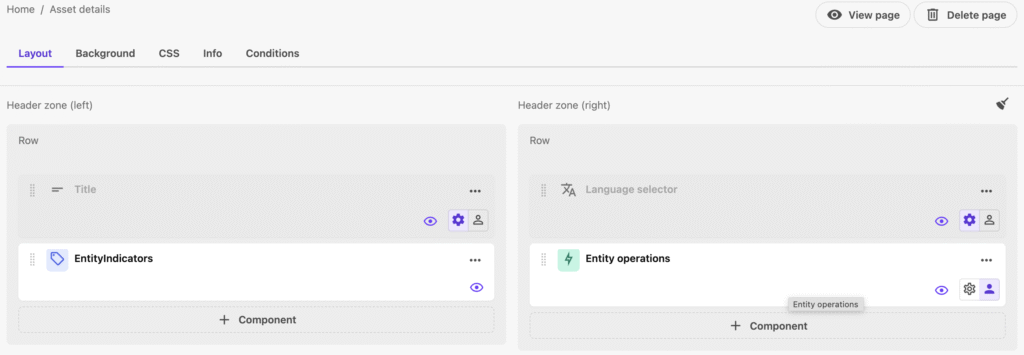
Now, let’s add an action to our Asset Details page. We’ll navigate to Settings, then click on Pages, then search for our Asset Details page in the search box. We’ll look for our Entity Operations component up top, and click on the person icon to enable custom settings. Then click on the Entity Operations component.
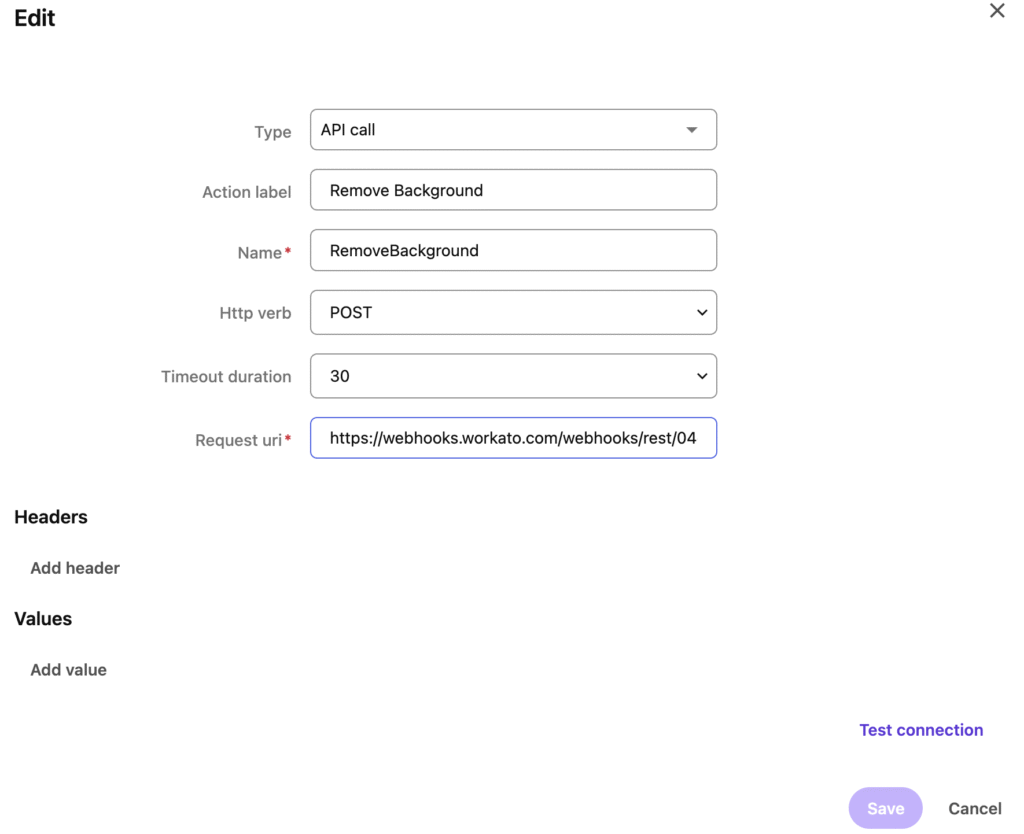
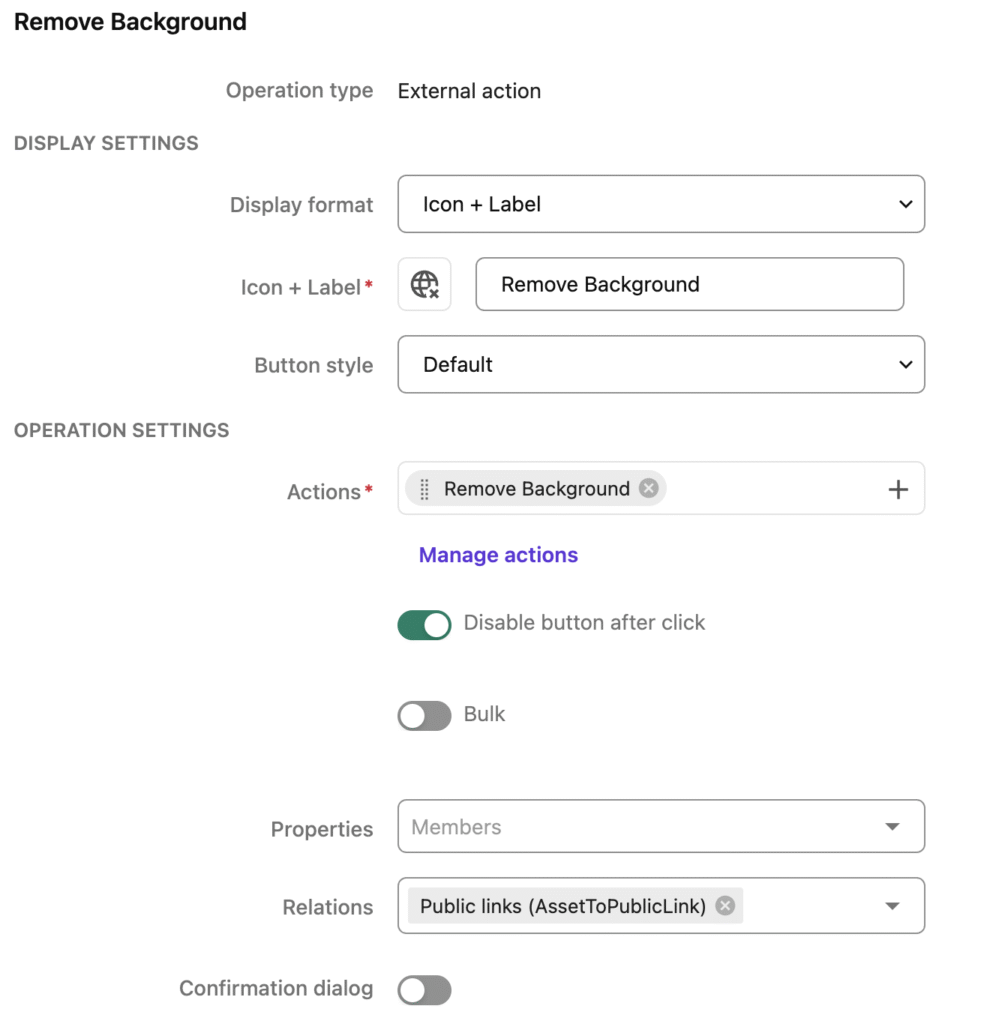
In the Entity Operations component, click on “Add operation”, then scroll down to the bottom of the list and click “External action”. Your settings on the right should look like these below. Keep in mind that you MUST select your Public links relation, otherwise you won’t send anything useful to Replicate during our Sitecore Connect recipes!
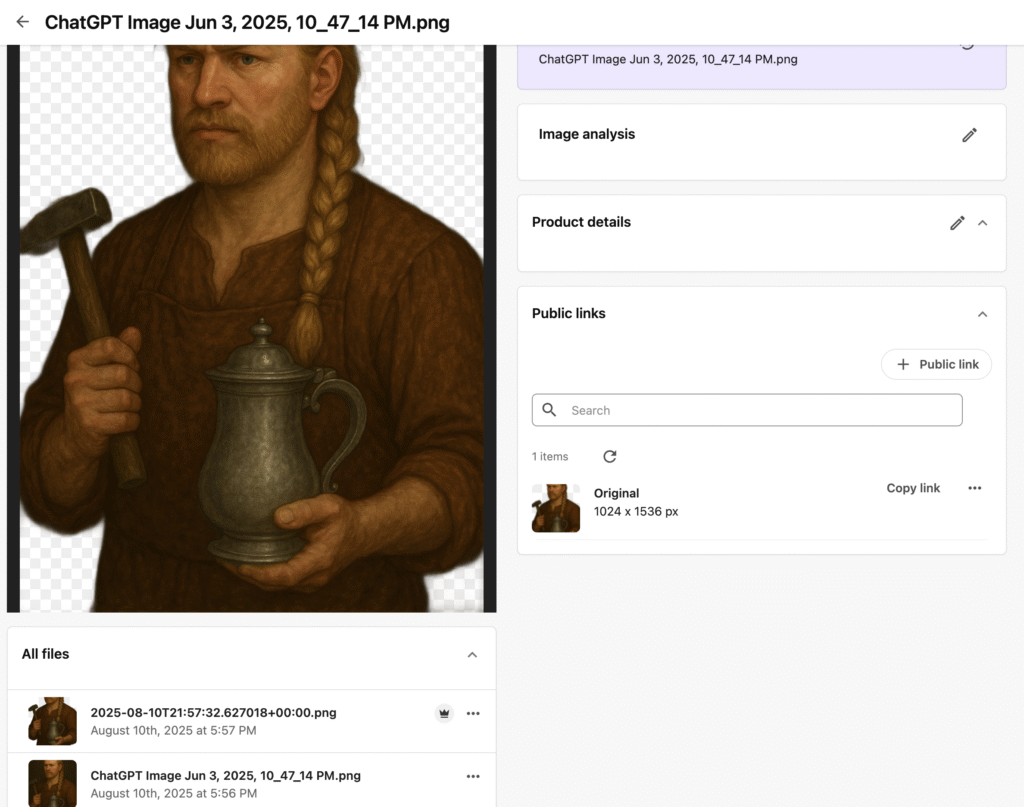
And that’s it! I won’t lie – this is probably much harder than it should be. However, you should be able to now start and test out both of your recipes. You can see an example of my working use case below:
Useful Info
- Change the “version” ID in Recipe A to use a different model on Replicate. A model’s version ID can be found under the “API” tab and then selected “HTTP”.
- Change “NewMainFile” in recipe B step 7 “Improved Post to Asset ID” to “NewAlternativeFile” if you don’t want to overwrite the main asset image.
- Upload v2 only works with items up to 1024 mb.
- Read the upload v2 API carefully: https://doc.sitecore.com/ch/en/developers/cloud-dev/upload.html
Leave a Reply